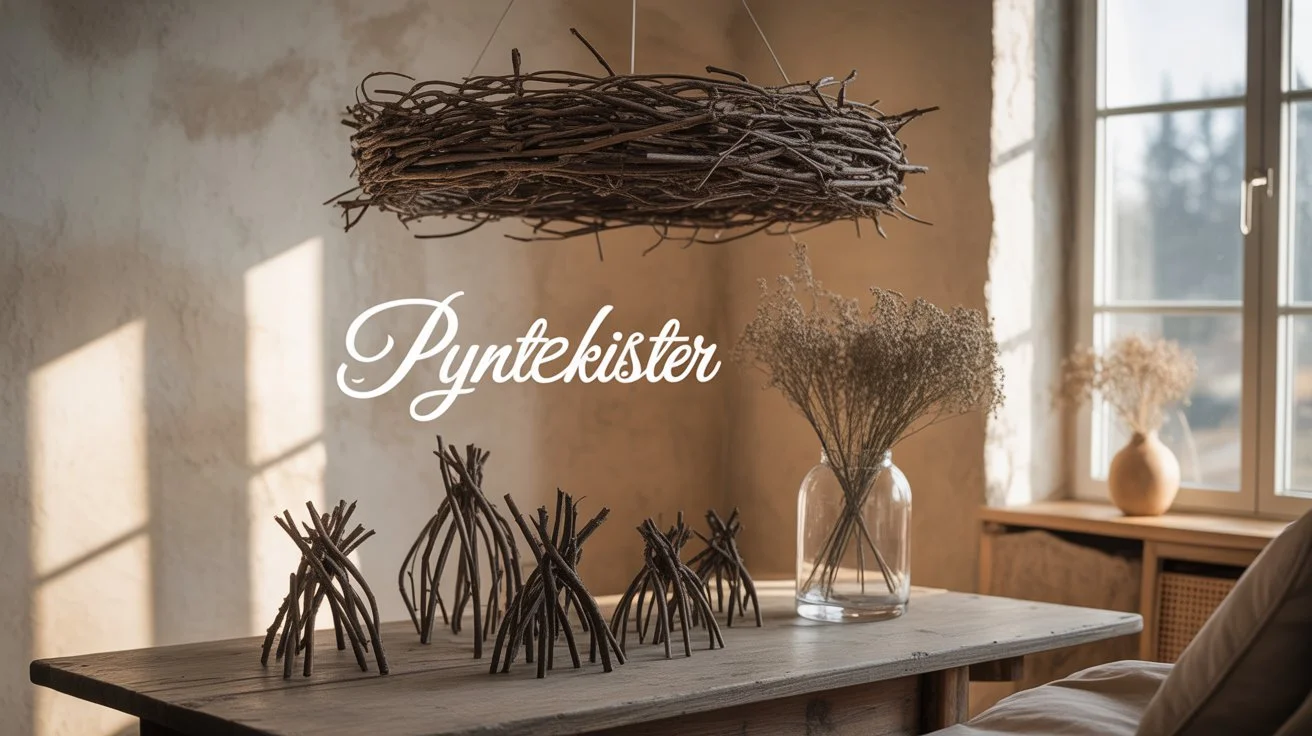
Discover creative DIY pyntekvister ideas to craft rustic twig decor that transforms your home. Learn easy, budget-friendly projects using natural elements for cozy, charming interiors. Perfect for home decor enthusiasts! DIY pyntekvister ideas, rustic twig decor, home decor crafts, natural home decor, budget-friendly decor.
Introduction
There’s something undeniably charming about bringing nature into your home. Pyntekvister—those delightful twigs and branches you can find in your backyard or a nearby park—offer a versatile, budget-friendly way to create rustic twig decor that adds warmth and character to any space.
As someone who’s spent years experimenting with natural materials in home decor, I can tell you that these simple elements can transform your home into a cozy, inviting haven. In this guide, I’ll share practical DIY pyntekvister ideas that are easy to execute, even if you’re new to crafting. Whether you’re looking to spruce up your living room or add a touch of rustic charm to your bedroom, these projects will inspire you to get creative with twigs.
Why Choose Rustic Twig Decor?
Rustic twig decor is more than just a trend; it’s a timeless way to connect your home with the beauty of nature. Here’s why it’s worth trying:
- Affordable: Twigs are free or inexpensive, making these projects perfect for budget-conscious decorators.
- Eco-Friendly: Using natural materials reduces your environmental footprint.
- Customizable: Twigs can be painted, stained, or left natural to match any aesthetic.
- Unique: Each piece is one-of-a-kind, reflecting your personal style.
Over the years, I’ve found that working with pyntekvister allows you to create decor that feels personal and authentic. Let’s dive into some DIY pyntekvister ideas that will elevate your home decor game.
1. Twig Wall Art

One of the easiest ways to incorporate rustic twig decor is by creating wall art. This project is perfect for beginners and adds a striking focal point to any room.
Materials Needed
- A handful of straight twigs (cleaned and dried)
- Canvas or wooden board
- Hot glue gun or strong adhesive
- Optional: Paint, twine, or decorative accents like moss
Steps
- Gather Twigs: Collect twigs of similar length and thickness. Clean them with a damp cloth to remove dirt.
- Plan Your Design: Arrange the twigs on your canvas in a pattern—think geometric shapes, a tree silhouette, or abstract lines.
- Secure the Twigs: Use a hot glue gun to attach the twigs to the canvas. For a polished look, wrap twine around the edges.
- Add Finishing Touches: Paint the twigs for a pop of color or leave them natural for a minimalist vibe.
- Hang It Up: Attach a hanger to the back and display your masterpiece.
Pro Tip: I once created a twig tree silhouette for a client’s living room, and it became the room’s centerpiece. Experiment with shapes that reflect your personality!
2. Pyntekvister Photo Frame
Turn a plain photo frame into a rustic treasure with twigs. This project is quick and adds a cozy touch to family photos or artwork.
Materials Needed
- Plain wooden or plastic photo frame
- Small twigs (1–2 inches long)
- Hot glue gun
- Optional: Spray paint or varnish
Steps
- Prepare the Frame: Remove the glass and backing from the frame.
- Cut Twigs: Trim twigs to fit the frame’s edges. Vary the lengths for a natural look.
- Attach Twigs: Glue the twigs around the frame, layering them for texture.
- Finish: Spray paint the twigs for a cohesive look or apply varnish to enhance their natural beauty.
- Reassemble: Pop the glass and photo back in, and you’re done!
My Experience: I’ve made these frames as gifts, and they’re always a hit. They’re simple yet add a handmade charm that store-bought frames can’t match.
3. Rustic Twig Chandelier
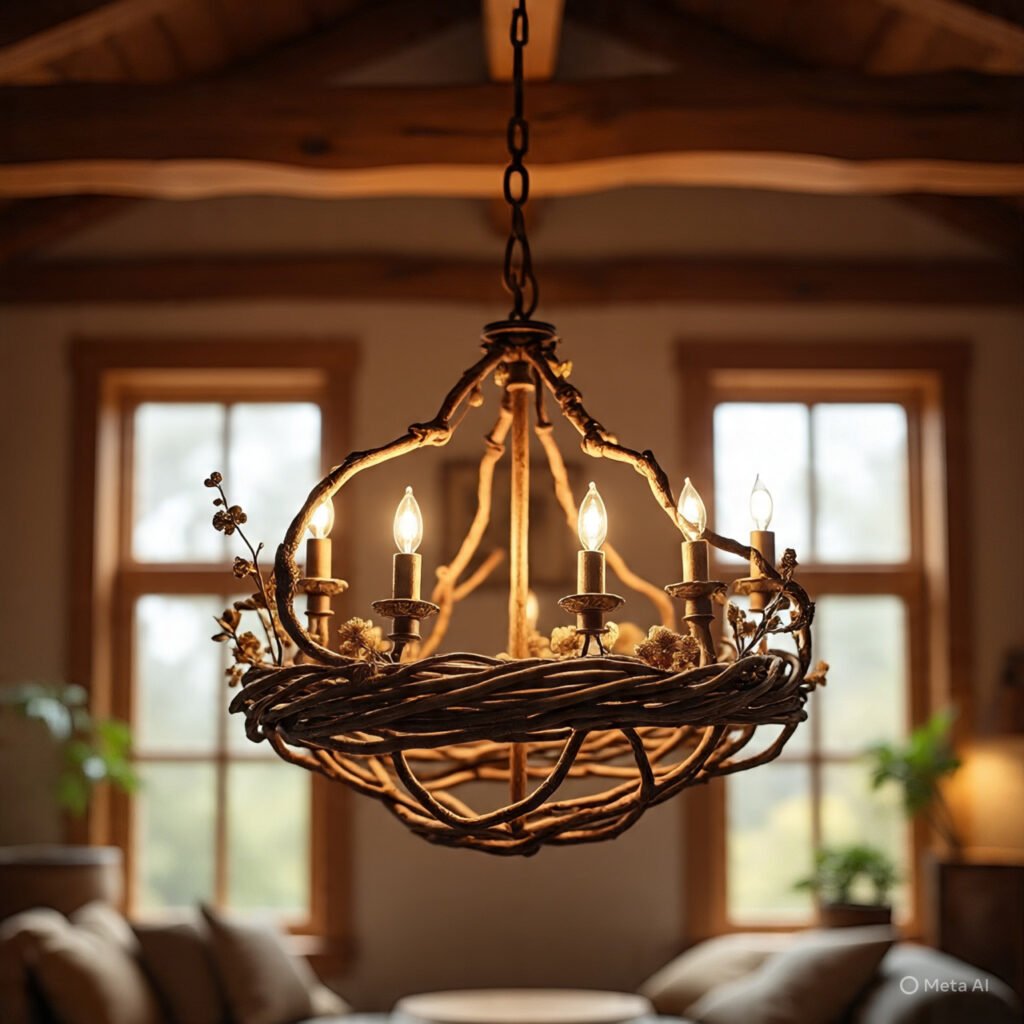
For a show-stopping piece, try crafting a twig chandelier. It’s a bit more involved but worth the effort for a stunning rustic centerpiece.
Materials Needed
- A bundle of flexible twigs
- A wire wreath frame or embroidery hoop
- Fairy lights or LED candles
- Twine or fishing line
- Hot glue gun
Steps
- Create the Base: Use the wire frame or hoop as the chandelier’s foundation.
- Attach Twigs: Wrap twigs around the frame, securing them with hot glue or twine. Overlap them for a fuller look.
- Add Lighting: Weave fairy lights through the twigs or hang LED candles for a warm glow.
- Hang It: Use twine or fishing line to suspend the chandelier from the ceiling.
Pro Tip: I’ve found that battery-operated fairy lights are the easiest to work with—no cords to hide! This project transformed my dining room into a cozy retreat.
4. Twig Vase or Candle Holder

A twig-covered vase or candle holder is a versatile piece that works in any room. It’s also a great way to upcycle old glassware.
Materials Needed
- Glass jar or candle holder
- Small twigs (cut to uniform length)
- Hot glue gun
- Twine or ribbon
Steps
- Prep the Glass: Clean and dry the jar or holder.
- Attach Twigs: Glue twigs vertically around the glass, covering the entire surface.
- Secure with Twine: Wrap twine or ribbon around the twigs for extra stability and style.
- Use It: Fill with flowers for a vase or add a candle for a glowing centerpiece.
My Experience: I’ve used these as table centerpieces for rustic-themed parties, and they always get compliments. They’re simple but make a big impact.
5. Pyntekvister Wall Shelf

For a functional yet decorative piece, create a small wall shelf using twigs and reclaimed wood. It’s perfect for displaying plants or trinkets.
Materials Needed
- A small wooden board (reclaimed or pre-cut)
- Sturdy twigs for supports
- Wood glue and screws
- Wall mounting hardware
Steps
- Prepare the Wood: Sand the board for a smooth finish.
- Create Supports: Cut four twigs to equal lengths and glue or screw them to the board’s underside as angled supports.
- Mount the Shelf: Attach wall mounts and hang securely.
- Decorate: Add small plants, books, or decor items.
Pro Tip: I built one of these for my home office, and it’s both practical and eye-catching. Make sure the twigs are sturdy enough to support the shelf’s weight.
Tips for Sourcing and Preparing Pyntekvister
- Where to Find Twigs: Check your backyard, local parks, or hiking trails. Always ask permission if collecting on private property.
- Cleaning Twigs: Soak in warm water with a bit of dish soap, then let them air dry to prevent mold.
- Storing Twigs: Keep them in a dry, ventilated area to maintain their quality.
- Safety: Wear gloves when handling twigs to avoid splinters, and inspect for insects.
In my years of crafting, I’ve learned that the best twigs are those that are freshly fallen—flexible yet sturdy. A quick cleaning makes them ready for any project.
Styling Rustic Twig Decor in Your Home
To make your DIY pyntekvister projects shine, consider these styling tips:
- Mix Textures: Pair twigs with soft fabrics like linen or burlap for balance.
- Neutral Tones: Use earthy colors like beige, brown, or white to complement the natural look.
- Layer Lighting: Add candles or fairy lights to enhance the cozy vibe.
- Seasonal Touches: Incorporate pinecones or seasonal greenery for a festive twist.
I’ve styled twig decor in my own home, and it’s amazing how these simple elements can tie a room together. They work especially well in living rooms, bedrooms, or even outdoor patios.
Conclusion
DIY pyntekvister ideas offer endless possibilities for creating rustic twig decor that transforms your home. From wall art to chandeliers, these projects are affordable, eco-friendly, and fun to make. As someone who’s spent countless hours crafting with natural materials, I can attest to the joy of seeing a pile of twigs turn into something beautiful. So grab some twigs, unleash your creativity, and give your home a rustic refresh. Have a favorite pyntekvister project? Share it in the comments—I’d love to hear about it!